
Wood carving is such a varied and beautiful hobby to have that can either require lots of heavy-duty wood carving tools or provide the basis for the perfect beginner whittling projects as a calm and slow process.
Whether you’re wanting to carve small and intimate gifts for friends and family, go all out for crafting your newest dining table or start a small figurine business by carving in the round. This ultimate beginner’s guide to wood carving has got it all.
Here are all the questions The Hobby Kraze team will get answered for you right here in this ultimate beginner’s guide to wood carving:
- What is Wood Carving?
- Where Did Wood Carving Originate?
- Can Anyone Do Wood Carving?
- Is There a Wood Carving Tools Glossary?
- What Are the Types of Wood Carving?
- Which Types of Wood Carving Tools Are Needed in a Wood Carving Kit for Beginners?
- What is the Best Wood to Get a Wood Carving Hobby Going With?
- What Are Some of the Best Beginner Whittling Projects to Try Out?
Before you learn to carve your wood, you should always be familiar with sharpening your tool. You may first need an axe, then a saw, then a gouge, then a chisel and then an X-Acto blade. All of which, no matter how soft your wood base, need to be sharpened!
There are really only three things you’d need for this: your tools, a sanding stone and some water.
Flick some water onto your stone, place the chisel (or whichever tool you’re using at that time) onto the stone, with one hand on the handle and the other hand on the other end of the tool. Lift the handle until the bezel is flat against the surface of the stone. Finally, simply move the tool back and forth to sharpen!
It’s pretty much the same principle for any of the tools you’ll use in your wood carving kit for beginners. This includes any crescent-edged tools like a gouge; when you’re sharpening, just be sure to rock sideways as well as moving back and forth and you’ll cover the entire blade.
Now you know how to keep your wood carving tools sharp, you can get going with this ultimate beginner’s guide to wood carving.
Table of Contents
- 1 What is Wood Carving?
- 2 Where Did Wood Carving Originate?
- 3 Can Anyone Do Wood Carving?
- 4 Is There a Wood Carving Tools Glossary?
- 5 What Are the Types of Wood Carving?
- 6 Which Types of Wood Carving Tools Are Needed in a Wood Carving Kit for Beginners?
- 7 What is the Best Wood to Get a Wood Carving Hobby Going With?
- 8 What Are Some of the Best Beginner Whittling Projects to Try Out?
What is Wood Carving?

Wood carving is one of the oldest pastimes in history; ever since man was able to use a sharp rock to hack away at something, they’ve been using trees, branches and tree trunks to create everyday items.
Now, when it comes to using wood to carve away today, it’s more of an art form that can result in stunning pieces of household furniture, keepsake holders or small decorations and gifts for those we love.
Using wood carving tools has become a past time that can provide many hours of fulfilling recreation. Yet, many believe it can be too dangerous or too expensive. In reality; it’s not. Especially if you choose the calmer, smaller and cheaper methods of carving rather than using expensive equipment.
As well as this, when it comes to gathering the tools, they’re all manual labour tools that are a first-time investment; anything after this is just the wood. And you can grab yourself a piece of wood that has fallen from a tree in the forest for free; it only becomes pricey if you decide to head for the exotic barks such as rosewood.
Where Did Wood Carving Originate?

Normally, here on The Hobby Kraze, we talk about hobbies and activities that have been around for thousands of years. Often, there is a story about the Egyptians and their contribution to the hobby.
However, as we’ve already mentioned, wood carving is an activity that has been around for nearly as long as man, themselves. So, it’s time to go even further back into the history books for this one.
Unfortunately, as this activity is just so old, there is no real way of pin-pointing the exact time and location or face behind the ingenious act of wood carving.
Throughout time, though, it has been prevalent that one of the most commonly whittled or carved item from wood (aside from the usual objects like plates, spears, paddles, etc.) appears to be religious statues or figures. From intricate buddhas to the more simplistic Christian cross.
One of the most famous and ancient of these is the Venus sculpture figurines that were created out of wood and ivory throughout the Palaeolithic period. She was always depicted as a mother; in obese and pregnant sense, she was the whole from which everything derived.
In fact, wood – for a very long time – was used for absolutely anything from homes to boats and everything big or small in between. However, it was the lack of longevity and the vulnerability to water absorption or insect habitation that led to other materials needing to be used throughout history to build new and lasting architecture.
So, as we get closer and closer to today, the ultimate beginner’s guide to wood carving does not resemble what it would have in the ancient world. Instead, it is more of a slow and delicate past time loved by many for sheer decorative purposes rather than the necessity of living.
Can Anyone Do Wood Carving?

As there are sharp tools involved and a lot of wood laying around, it is suitable to anyone over the age of 13 (or those who are in secondary school throughout the UK) and can be fully supervised.
As well as this, it is a hobby open to anyone with the suitable space. Whether it’s a large room in the house, a classroom or even in the garden filled with fresh air; constantly chiselling, bevelling and filing down the wood can create clouds of sawdust in the air that can be harmful to the lungs.
Not to mention the rogue splinters (we’ve been there, got the T-shirt and highly recommend using scratch-proof gloves).
Other than these quick considerations, it really is a hobby open to anyone. However, we do suggest always having safety first. Here are some top tips for you to make use of when you open up your wood carving kit for beginners:
- Never hold your wood on your lap
- Use a flat table to stabilise your wood
- Find a vice to secure the wood for a two-handed approach to chiselling
- Operate in a well-ventilated area
- Invest in some anti-fog safety goggles
- Use workers gloves for thick hand protection
- Don’t start your hobby by using electrical Dremel’s
- Make sure there are no little ones in your woodworking shop
- Keep wood carving tools in a safe place
- Use dust masks to save your lungs
Is There a Wood Carving Tools Glossary?

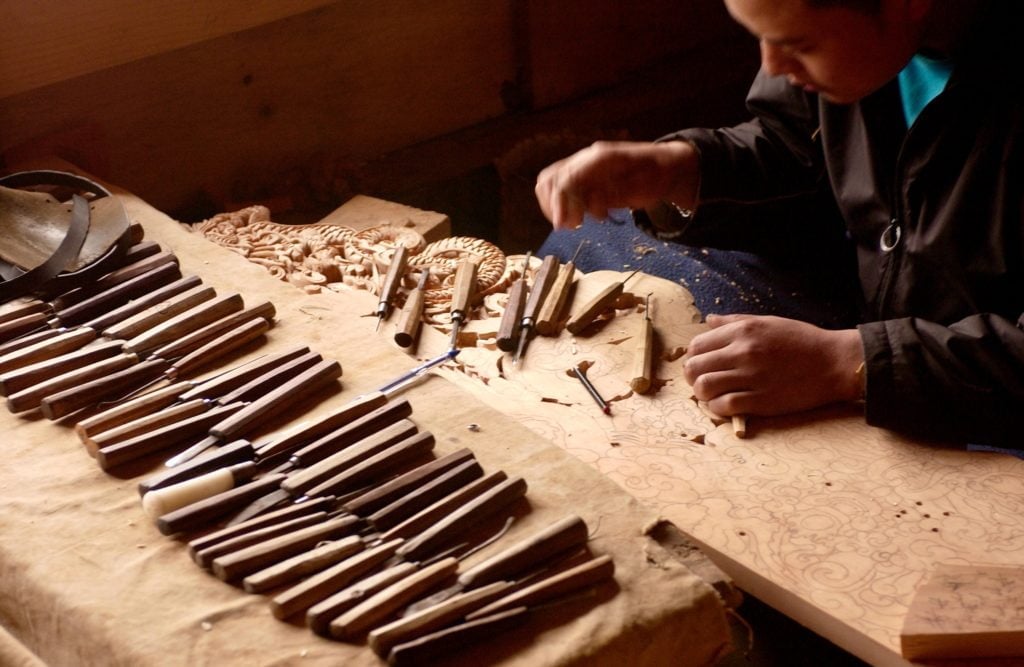
Of course, there is. We would never tap you on the head and push you into a hobby without giving you the full ins-and-outs about what could be going into your wood carving kit for beginners.
And, when it comes to woodwork, there are a lot of different tools you could come across. In fact, there are many more in this list that just focus on the electrical equipment side of things. But, as you’re a beginner and even the slightest of slips on a softwood surface could lead you into a red mess, we’ll just be touching on the manual side of things.
Each of these 9 wood carving tools have their own slick design and sharp bezel that helps them carve a certain shape in a certain way. So, it’s worth thinking about what you’re wanting to make with your wooden wedge and deciphering which of these tools you should stick in your toolbelt.
Bench Knife
First up is the Bench Knife. Not to be mixed-up with the bench knife used in the kitchen, this knife is a small and handy tool to have. It features a short rectangular blade that is very handy for the more intricate markings and cuts in the wood.
However, that doesn’t mean it isn’t perfectly capable of handling some big chips, too. In fact, there are many woodworkers and carvers out there who decide to make entire art pieces using only the Bench Knife.
When the blade is slightly lengthened, it becomes a Sloyd Knife (at around 5 inches in blade length) used for intermediate and beginner whittling projects.
Carver’s Mallet
This is an unmissable mallet to be used in conjunction with a general chisel. These are often made with hardwood and a large, rounded end. They are used to tap and drive a chisel into a wedge of wood for the purpose of taking away large chips of wood or even halving a piece of wood to make smaller chunks ready for carving in the round or whittling projects.
Carving Knife
This is one of the most widely used out of all the wood carving tools around the world. It can be used for pretty much any aspect of wood carving from the get-go straight to the finishing touches due to the sharp and curved blade. They typically come in a variety of shapes to get the job done.
However, due to the sharpness of the knife, it’s highly recommended to grab hold of a pair of leather finger guards to cover your thumb and index finger; they’re the perfect level of protection to safely cover your fingers from any sharp object. With this, they are used in a variety of hobbies including sewing.
For more information about how to get started in a hobby involving needle, thread and leather finger guards, have a read of our article, “The Ultimate Beginner’s Guide to Sewing”.
Chisel
A chisel is an iconic feature for any woodworking activity, so it’s right to find its place here in the ultimate beginner’s guide to wood carving.
Characteristically, a chisel has a wooden handle and a long rectangular blade. It’ll generally have a sharp bezel on one side of the chisel, be it the left, top or right-hand side.
As well as this, they can often be bought in the flat-based, rounded-based or V-shape based formats. With this, there are a ton of names such as the Bench Chisel, Paring Chisel and Mortise Chisel which all have their own way of slicing, carving, chiselling and shaving.
If you angle the top bezel, you’ve then got what’s known as a Skew Chisel or a Corner Chisel.
Coping Saw
A Coping Saw is a very small and hand-held saw featuring a wooden handle and a hook. Then, a specific and thin saw blade is attached from the head of the hook to the handle to allow for very small and flexible shape sawing that other larger and more generic-shaped saws simply wouldn’t master.
Fishtail
The Fishtail is a small and unique addition to your wood carving tools simply because it features a tip resembling the thinning and widening of a fishes tail.
These types of carving tools are very useful for reaching smaller nooks in the wood finishing and detail that other broader chisels would be too large or incorrectly shaped for. When your wood is in a jag and you’re concentrating on lettering, modelling, finishing or skimming, you’ll want to grab your Fishtail tool.
Gouge
If you’ve ever sat staring into space wondering what an elongated ice-cream scoop would look like, you should have a gander at the Gouge. While it might seem like a strange thing to have in your toolkit, once you’ve got one, you’ll never know how you lived without it.
They’re typically broad, thick and long with the goal of creating hollows in the wood. With the curved edges, they are perfect for making concave shapes with pre-finessed bends in the carve. They can be deep or shallow hollows depending on the angle you place the Gouge.
Riffler
The Riffler is the filing tool. They are double-ended wood carving tools made of metal featuring a range of shapes for all the different concave and convex details of your wood sculpture.
With this, the Riffler is normally bought from craft and tool stores in specific sets that provide all the strange shapes and angles you never even knew you needed.
As well as this, they’ll all have their own unique size, shape and pattern of edges that finish your wooden artwork with a different level of smoothness.
Veiner
Last on the list is the Veiner tool. Often confused with both the V-shaped Chisel and the Gouge, the veiner is a very small and thin crested-edge carving tool. It does the job of the V-shaped chisel and the Gouge in that it is made for making grooves and hollows in the wood, but they are often much finer and more detailed.
What Are the Types of Wood Carving?
We’ve mentioned all the different types of wood carving tools you’ll need within your wood carving kit for beginner’s, but we haven’t quite touched upon the different wood carving manoeuvres you’ll be doing with these various tools.
There are five avenues of wood carving you could venture into as you chisel away at this hobby. With some wood carvers sticking to just the one type and other’s dipping their toes into each of the different pools of art.
One thing to note is that we have included Dremel work within the five types of woodwork. And, while we want you to be able to explore and decide for yourself which of the types of woodworking suits you, this is the ultimate beginner’s guide to wood carving.
With that, it’s best to maybe take a pick out of the first four more traditional, manual and safe approaches to this wooden hobby.
Whittling
Whittling is the oldest way of the wood carver, taken up within the palaeolithic period when carvers used sharp rocks to whittle away at the wood until the ideal shape was achieved. Today, however, it’s more finessed and incorporates its fair share of Chisels and Rifflers to generate the desired effect. A whittled piece can always be identified due to the finish; it’s often seen as geometric in design as each broad ‘knife stroke’ is left behind.
Relief Carving
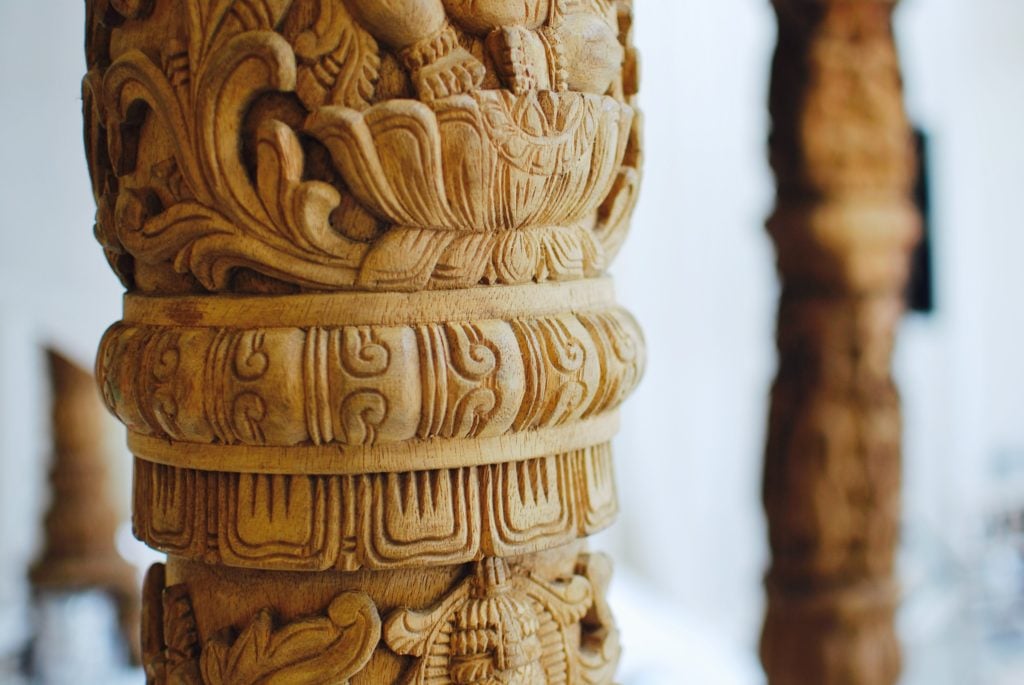
Relief carving refers to the way the wood is taken away from the backing. While other projects might render whole and rounded objects, relief carving leaves the design on the wood with an impression in 3D. Some examples are often seen on walls, on doors and in artwork. With this, there are also a few different techniques of relief carving that leave unique finishes. For example: there’s high-relief, middle-relief, low-relief, sunken relief and statiacciato relief.
Carving in the Round
Third up is carving in the round which, as the name might explain, creates round objects with a smooth finish. Unlike whittling, carving in the round doesn’t leave the same geometric print: it’s far smoother and more detailed. And, unlike relief carving, carving in the round focuses on all angles of the wood rather than simply the front to be on show.
Chip Carving
Chip carving involves the Carver’s Mallet and Chisel combination we mentioned earlier. Together, they aim to remove pieces of wood bit-by-bit with each chip flying off the sculpture smaller than the last. It is one of the most commonly used type of woodwork simply because wood carvers tend to use chip carving techniques to reduce the size of a wooden wedge before going on to create the finer details with other techniques.
Dremel Work
Dremel work requires the use of an electric power tool with the end of a file. The Dremel simply files down the wood to the depth, size and shape that you’re wanting to carve. Today, they are often used by personalising artists and those looking to make specific lettering without wanting the wood to split. Different Dremel heads result in different effects, but you’ll be able to experiment with these down the line.
Which Types of Wood Carving Tools Are Needed in a Wood Carving Kit for Beginners?

Despite delving into the wood carving tools glossary for knifes and chippers, they aren’t the only pieces of equipment that you should be thinking of. There are other things you’ll want to add to your workshop in order to make your beginner whittling projects run a little smoother: that’s if you want to whittle at all rather than go into relief carving or carving in the round.
There is an array of safety equipment you should have in your artillery as well as securing tools, cleaning tools and extra things on-hand that make your wood carving experience all the more enjoyable.
For example, many don’t consider having a small bucket of water by their side. When in the office, this helps to release humidity while taking care of loose dust. Plus, it is very handy when sharpening your wood carving tools on the sharpening stone because it removes the frictional heat and yields a smoother finish on your tools which helps them to last longer and work more precisely.
With that, the team here at The Hobby Kraze have put together the complete list of tools, equipment and items you should have when you start to use your wood carving kit for beginners.
- Sharpening Stone
- Bench
- Jib
- Tool Belt
- Anti-Fog Safety Goggles
- Workman’s Gloves
- Dust Mask
- Full-Coverage Clothing
- Covered Water
- Working Water
- Wood
- Toolkit
- Bucket
- Vice
- Leather Finger Guards
- Pry Bar
- Wrench
- Spare Saw Blades
- Measuring Tools
- Pencil
- Spirit Level
- Brush
- Clamp
- Sandpaper
- Varnish
- Rocket Blower
- Plane
- Cutting Board
- Wood Glue
- X-Acto Blade
- Wrench
- Wood Threader
- Turntable
- Scraper
- Axe
- Moisture Meter
What is the Best Wood to Get a Wood Carving Hobby Going With?

As a beginner to the wonderful world of wood carving, you’ll want to get your hands on some of the softer woods that make it a little easier to work with.
This is because, you’ll likely not have that finessed level of intricacy, concentration and fine hand movements that are needed to achieve the perfect carve. With this, it’s important you’re not placing yourself in danger with a mix of sharp tools and hardwood.
So, as you’re getting started as a beginner with wood carving tools, a tip from the team here at The Hobby Kraze (who have had their fair share of silly accidents while trying their luck at each and every new hobby you can think of) is to start off by using softwoods. They’re easier to carve, are typically cheaper in case of mistakes and are less likely to leave you slipping over the wood and landing in a painful predicament.
From light and dark to the speckled flavours in the middle, here are some of the best types of softwood to go into your wood carving kit for beginners:
- Basswood
- Black Walnut
- Butternut
- Cedar
- Cherry
- Mahogany
- Rosewood
- Sugar Maple
- Sycamore
- Tupelo
- White Oak
- White Pine
What Are Some of the Best Beginner Whittling Projects to Try Out?
On day number one of picking up a chisel and a chunk of wood, you’ll want something small, simple and speedy to get on with.
So, to get going, we’ll let you loose with the four basic cuts of wood carving and then give you an array of ideas for your first beginner whittling projects!
The first cut is called the Sweeping Cut. This cut gently pushes a slither of carved bark off the wood in a smooth fashion for a perfect finish. The Sweeping Cut requires a very sharp blade, meaning the Carving Knife or the Bench Knife will be your tools of choice.
Second is the Stop Cut. Exactly as it sounds, this cut takes the blade deep into the wood to a point. Then, the blade is removed and driven back into the end of the original cut at a perpendicular angle to effectively “stop the cut in its tracks”.
The third is the Vee Cut which creates an angular V-shape within the wood much like the mark a V-shaped chisel or veiner could make. Often, this features a 45-degree angle, but depending on your project it can vary!
Finally, the fourth cut is the Pyramid Cut. The effect is opposite to the Vee Cut in that it creates a convex shape resembling a pyramid. This is done by carving the surrounding wood to leave a relief carving impression.
And now, for the beginner whittling projects:
- A Small Bear
- A Tree Branch Wood Spirit
- A Mushroom
- A Cutlery Set
- A Dog or Cat
- A Simple Garden Gnome
- A Cup
- A Trinket Box
- A Small Wooden Heart
- A Name Plate Block
- A Chess Set
- A Guitar Pick
- An Easter Egg
- A Recorder
And that concludes the last chip in this ultimate beginner’s guide to wood carving. From gathering your wood carving tools to getting started with your beginner whittling projects, you’ve got all the tools and knowhow to have fun and explore with wooden artwork.
If you’ve found wood carving by hand isn’t the hobby for you but you still want to create beautiful wooden designs with delicate and intricate carvings, there is another way: by using a 3D printing machine that features a Dremel tool.
Luckily, our team here at The Hobby Kraze has already been right at work on the job for you, so you can go ahead and have a read of: “The Ultimate Beginner’s Guide to 3D Printing”.
Don’t forget to share and let the team know about which hobbies you’d like to see next!
