
Camping is an excellent way to get outside and enjoy the great outdoors. You can do tons of fun activities while you camp, like hiking, mountain biking, and rock climbing to name a few. The biggest problem that most people face after spending all day playing outside is how to stay clean.
While you can definitely take a wipe bath by using baby wipes to clean yourself off, it’s no replacement for a full-on shower. But how do you go about doing that? Well, it really depends on the way that you go camping!
There are tons of ways to go camping, which means that there are also tons of ways to take a shower while camping. For that reason, we’ve broken our methods down into 3 common ways that people camp so that we can offer a solution to each group of people. Feel free to read through each method or skip around to the method that is most useful to you!
Table of Contents
Camper Method

Using a shower while you camp with a camper is one of the easiest ways to get clean. Most campers come equipped with a shower on the inside and outside of the camper. Why two? Well, there are pros and cons to using each.
For interior showers the pros are:
- High degree of privacy
- Best done when it’s cold outside
- All of your shower products can be organized for easy access
The cons for interior showers are:
- Small space to move around in
- Not very good to use if you’re particularly muddy or dirty as the particles will clog the shower drain up
When you’re considering buying a camper, be aware that there are two styles of bathrooms that you can get your camper in: dry or wet bathrooms.
In dry bathrooms, the shower and toilet are separate entities, kind of like in a normal residential bathroom, but on a much smaller scale. These are great when you have multiple people using the camper at the same time so that your bathroom space can remain as sanitary as possible.
In wet bathrooms, the shower and toilet area are basically combined. This saves on space and can reduce the weight and cost of your camper. The biggest downside of this style of bathroom is that it takes a bit more cleaning to keep the entire space sanitary for use. It’s best to get a wet bathroom if you’re going to be using it with no more than one other person.
Regardless of the style of bathroom that your camper comes with, you’ll likely have an exterior shower built into your camper as well. Exterior showers are great because they work very similarly to interior showers, so the learning curve is very low.
 Outdoor showers have a few pros, like:
- You can clean up before tracking dirt and mud into your camper
- It can be used to clean up your pets, so they don’t track mud into the camper
- Gear can be sprayed down after you’ve sprayed yourself down
- Easy to keep clean
Outdoor showers aren’t for everyone though. Here are a few cons to consider with your outdoor shower:
- No privacy unless you create an outdoor shower stall
- Can be a bit messy depending on what you’re showering on top of
- Will be a bit chillier compared to showering inside
If you are in a particularly messy place, outdoor showers can be a godsend. You’ll be able to easily avoid tracking nasty stuff back inside of your camper. Of course, you’ll likely have to deal with the fact that you won’t have as much privacy as an interior shower, but with the right ingenuity, you can create a space that makes it easy to have privacy while using your exterior shower.
Another thing that you need to consider is the fact that you’ll likely be standing on a dirt surface when you shower outside. For that reason, be sure that you have a way to stand up and out of the dirt before you shower outside. Have some sandals on so that you keep your feet from getting dirty while you shower too.
And of course, be sure to have a way of organizing your shower materials when you shower outside. A shower caddy is a great way to keep all of your hygiene products in one easy to move around spot. Shampoo, conditioner, body wash, and anything else you need to get fresh and clean can be stored in a shower caddy to use when you shower outside.
The best part about exterior showers is that most every camper has one. From the fanciest of glamping RVs to the humblest of pop-up campers, you have access to a shower.
But what should you do if your camping vehicle doesn’t come with a shower installed on it?
Van Method
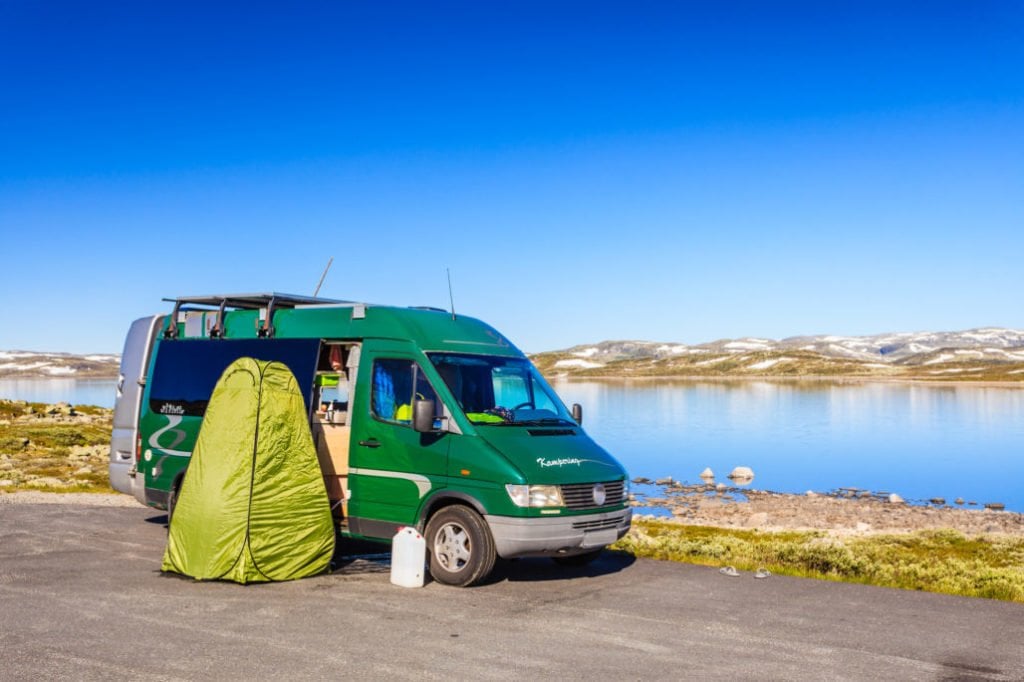
Something that has been trending quite a bit within the last few years has been the rise of van campers. Whether you’re using a van as a temporary shelter and camping in it on the weekends or you’re living that #vanlife, you’ll need to find a method to shower when you’re away from civilization.
In order to get a good shower in while also using the structure of your van to help you, you’ll want to follow this guide for building your own outdoor shower.
First, be sure to install a sturdy roof rack system on your van. Most sprinter vans don’t come with them installed, so you’ll want to get one professionally put on the roof so that you have the maximum amount of strength for your rack.
The main problem that most self-install roof racks like Thule or Yakima have is that they aren’t rated for very high dynamic weight. This basically means that their ability to support heavier items is very low while your vehicle is in motion. Self-install racks are great for lighter items, but for a shower, you’ll want the beefiest rack you can afford.
After your roof rack is installed, you’re going to gather these supplies to create your van shower:
- 4” PVC pipe (sized at schedule 40) cut to the length of space you have on your roof
- 1 PVC t-pipe connection
- 1 screw cap for the t-pipe connection
- 2 4” PVC caps
- PVC cement and primer
- Drill with ¾” drill bit
- Teflon tape
- ½” hose bib
- Silicone sealant
- U-bolts, nuts, and washers
- A tire valve made out of aluminum
Now that you’ve gathered all of your supplies, let’s create that exterior shower!
- Start by securing one of your PVC caps to a bench.
- Drill two holes into the cap and be sure that you separate them by about an inch. This is where you’ll install your hose bib and pressure tire valve to add pressure to your shower.
- After you have made the holes, install your tire valve and your hose bib so that both are facing out of the cap.
- Cover both sides of the openings with the silicone sealant so that they stay watertight.
- Now that the end cap that has the tire valve and hose bib is fabricated, use a Sawzall or hack saw to cut about 6 inches off of the end of the 4” length of PVC pipe. Save the cut end for later.
- With your t-fitting, prime the inside of both ends of the t and the outside of the long and short end of your cut 4” PVC pipe.
- Stick your t-fitting onto the long end of the PVC and hold it there for a moment.
- After the t is secured to the long end of the pipe, press the cut end onto the opposite end of the t.
- Now, with the t fitting complete, repeat the priming and gluing procedure with the cap that you prefabricated earlier.
- Glue the prefabbed cap onto the shortened end of the PVC.
- With the other cap that you didn’t alter, prime and glue it to the opposite end of the 4” PVC pipe.
- Screw the t-cap onto the t pipe fitting and you’re done making your shower!

Source: @mrandmrsadventure
Now that your shower has been put together, let’s go over how to use it. You’ll fill your shower at the top where you screwed the cap into the t-fitting. Fill enough water into the shower, but not so much that it gets close to coming out of the pipe. You want to leave some space at the top for air to pressurize the shower so that the water can be sprayed out of the hose.
After your shower is filled, connect a hose onto the ½” hose bib. The best thing to do here is to use a hose that has a sprayer head that can be controlled by squeezing a trigger to release the water. The last thing you want to have happen is for the water to run out of your hose and you not be able to control the flow of it!
Once you have connected your hose, pressurize your shower by pumping it up with a bike pump or air compressor. Pump your shower up so that you have consistent water flow coming out. It won’t take too much, so just play with the pressure a bit to find a happy medium. 4” schedule 40 PVC can handle 220 PSI (pounds per square inch) of pressure before they burst, so pay attention to how much pressure you’re putting into your shower.
After you’ve pressurized your shower, it’s time to turn it on! Open the hose bib to allow water to flow into your hose. Now you’re able to shower outside!
But if you’re wanting a more private shower, you’ll need to add one more thing onto your roof rack. You can create a round shower curtain rod pretty easily so you can have a private shower while outside!
One of the easiest ways to take care of this problem is to purchase a u-shaped curtain rod off of Amazon. Search for outdoor, u-shaped curtain rods and choose one that you like the best. After it arrives, take it to a hardware store and look for some U-bolts that will fit the circumference of the curtain to secure the shower rod onto the roof rack when it’s in use. Be sure to buy some washers and nuts to hold the curtain rod securely to your roof rack.
Test out your set up but affixing the curtain rod to the roof rack. Set the curtain rod on top of the roof rack and put the U-bolts onto the curtain rod. Screw on the washers and nuts under the roof rack so that the curtain rod stays in place.
Hang a curtain from your curtain rod and presto! You’ve got a functional outdoor shower space that will give you tons of privacy.
Take your van shower one step further by building a surface to stand on while you shower. The reason why you need an elevated surface to stand on is that it will keep your feet from getting muddy as your shower water hits the ground.
This is a pretty easy project as you only need some wood, a sander, some deck stain, a saw, some screws, and a drill.
Start by cutting the wood into several small sections. Aim to create a shower surface that is about 1’x1’ in area. Next, orient the wood to make a small pallet shape. With the wood in the pallet shape, use your drill to screw in the screws to secure each piece of wood together.
Now that has been complete, use your sander to create a nice smooth surface. This will help you avoid getting splinters in your feet! Once it’s nice and smooth, apply the deck stain to the entire shower surface. This step is important because it will keep your shower surface in good condition for many uses.
Once it has been stained, your shower surface is ready to be used! Whenever you want to take a shower, simply set it down inside the perimeter of your shower curtain to stand on something clean while you shower!
Tent Camping Method

For those who tent camp, you don’t have access to an interior shower or exterior shower like those who use campers do. You also likely don’t have the space to create your own PVC shower like on a camper van either. So, what can you do to take a shower while tent camping?
Well, the first thing you can do is camp in campgrounds that have access to showers. This is one of the easiest solutions as you don’t need to bring anything extra with you to set up a shower outside. Many national park campgrounds have showers, so be sure to reserve a spot at a campground that has shower access if you want to have easy access to showers.
If you plan on going camping outside of a campground, you can still take a shower. The easiest solution to showering while camping is to bring along a portable shower stall.
These are great, because they are easy to set up and take down. They have hooks at the top of the stall to hang a shower bag from, which means all you need to do is control the valve to open up the flow of water and let gravity do the rest of the work!
If you want a shower that has a bit more water pressure, you can get shower buckets that you can pressurize by using the attached pump. It works in the same way as the PVC shower does in terms of putting air pressure inside of the bucket to push water out.
In either case, you can take extended camping trips all over the place and still remain hygienic while tent camping by bringing along a portable shower stall and your shower delivery method of your choice!

Final Thoughts
There are so many ways to shower while you go camping. It doesn’t matter how you go camping, you can always stay nice and clean no matter what.
Make sure that regardless of how you shower that you consider using biodegradable soaps and shampoos to limit your impact on the environment. This is especially true for van campers and tent campers as the soap from your shower will get rinsed right onto the ground and into the soil.
Now that you have a good idea of how to shower in any modality, get out and enjoy your next camping trip with the knowledge that you can stay fresh and clean no matter where you go!
