
Have you ever wanted to improve your balance and coordination, but didn’t know where to start? Look no further than the humble balance board! A balance board is a fun and challenging tool that can help you develop your core strength, improve your posture, and increase your overall balance and stability.
And the best part? You can make your own balance board with just a few simple materials and a little bit of know-how
If you’re looking to improve your balance and coordination, you will soon realise that a DIY balance board might be just the thing you need! While balance boards are often associated with board sports like longboarding and skateboarding, they’re great for anyone who wants to develop their core strength and stability.
With a hard top and rounded bottom, a DIY balance board requires quick movement and strong balance skills to use effectively. In this article, we’ll show you how to make your own balance board step-by-step, so you can start improving your balance and coordination in no time!
You can purchase balance boards at various stores including sports stores, skate shops, surf shops, and Amazon. In fact, they’re quite easy to find in part because it’s become a recent fitness craze. On the other hand, what if you could build a high-quality balance board yourself that’s fully customised to meet your individual needs? You’ve come to the right place because we’re here to show you how to make a DIY balance board.
Table of Contents
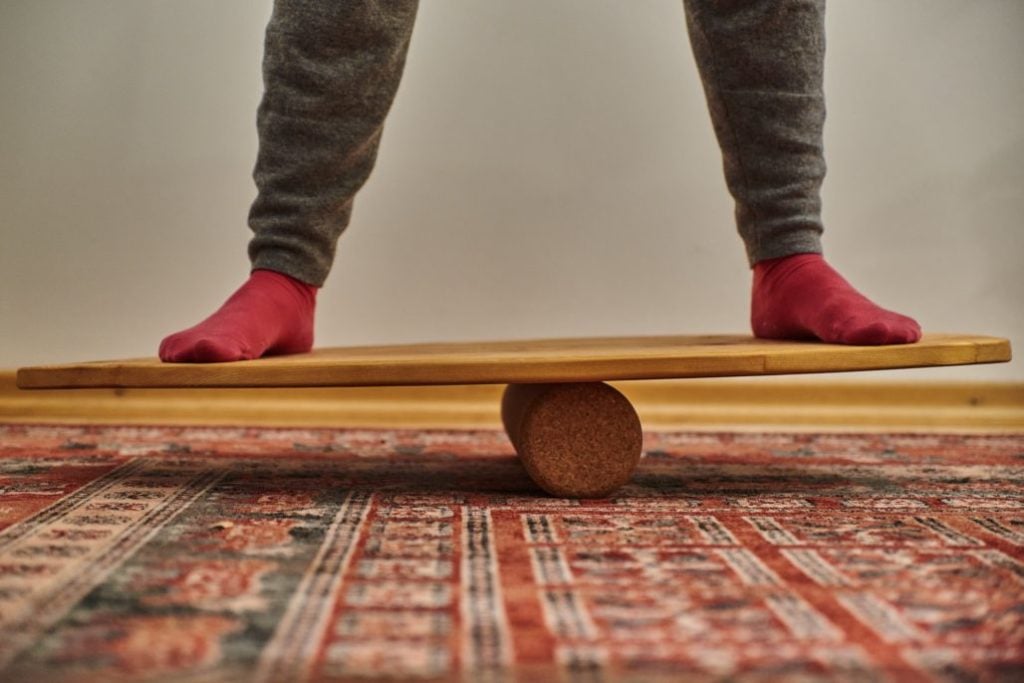
What is a balance board and how is it used?

Have you ever watched those workout videos on YouTube and wondered what those people are doing on those wobbly boards? Well, those are balance boards, and they’re not just for fitness enthusiasts.
And the best part? Anyone can ride a balance board, whether you’re a beginner or an expert skater. It’s a fun and challenging way to develop your core strength and balance skills, and it’s even effective for injury recovery.
Imagine using a balance board to speed up your recovery so you can get back to your favorite sidewalk surfing or roller-skating activities. It’s like having a personal rehab coach right in your living room! In this article, we’ll show you how to make your own balance board step-by-step, so you can start improving your balance and coordination and get back to doing what you love.
These boards are something effective since the board’s unstable surface requires them to use their ankle muscles to achieve and maintain balance. Besides improving balance, the boards can also help to increase upper body stability and core strength. In fact, one can perform exercises while standing on the board to improve strength, balance, and stance.
While there are more than a couple different balance boards, the main structure is a flat top and dome-shaped underside located in the middle of the board. This way, the user can move in various directions. These wobble boards can be rectangular-shaped or U-shaped. The shape allows side-to-side or front-to-back movement.
Is there anything different between a wobble board and balance board? This round board offers ways to “wobble” like side-to-side, front-to-back and in a circle.
Is it easy to make DIY balance boards?

Making a diy balance board is something that can be quite easy. As with other DIY projects it just requires having the equipment, know-how, and motivation to build your own balance board. Another plus is different age groups in your household from kids to adults can utilize the deck as a kids toy, longboard trainer, or rehab equipment.
One of the main perks is this is a cost-effective way. So if you’re on a shoestring budget or looking for an affordable DIY project, this might be a good option for you. In fact, the process is so easy you can often swap in substitute materials/supplies if you don’t have some of the required ones.
How to make a balance board

Materials:
- Plywood board
- Balance board: (16” x 30”)
- Bumpers/Stoppers (8” x 15”) 2 pieces
- PVC pipe (4” or 6.5” diameter)
- Small screws (4 pieces)
- Wood glue
- Grip tape or Duct Tape
- Sandpaper (coarse/medium/fine grit)
- Clear gloss polyurethane (1/2 pint)
- Wood stain (1/2 pint)
- Pain or decals
Tools:
- Jigsaw
- Power sander
- Power drill or screwdriver for screws
- Foam roller
- Safety glasses
Instructions
Here’s all the information/steps you need on how to make a balance board:
Step 1
Buy a piece of hardwood or plywood (2 ft. x 4 ft. 3/4 in.). If you’re on a tight budget you can select scrap wood as a substitute. It’s better to go with a sturdier option like hardwood if the board is for your entire family.
Step 2
Trace the board’s shape onto the plywood. You can download shapes that can provide a basic shape for your deck. If you want a faster and easier process then just make a straight-side board. It won’t look as sporty but can still improve your longboarding skills.
Step 3
Put on your safety goggles. Then clamp down the board and operate the jigsaw to cut around the board’s outline. This will give you the shape that you’ve downloaded for the deck.
Step 4
Utilize anything left over from the deck to cut rectangular bumpers for the deck’s underside. This process will add extra stability to the board. The roller then has a stopping point and the board won’t fly out from under your feet if you move side-to-side too quickly.
You can use the leftover scrap wood to make the bumpers. They should be approximately 2x wide as they are long.
Step 5
Sand each balance board piece. Start with a course-grit sandpaper piece to sand all the edges/sides from top to bottom. Then use a medium grit sandpaper piece. Finally, use a fine grit piece. If you want to speed up the process then use a palm-size power sander. An alternative is to wrap sandpaper around an extra block to make the process slightly easier.
Step 6
Use a damp rag or track cloth to clean up the deck and bumpers after you’re done sanding.
Step 7
Use your preferred color to stain the board. Simply add wood stain to both the board and bumpers. Then let it dry for 5 or 6 hours in a dry area with good ventilation. If you want a darker color then add extra coats. In general, two is enough.
Step 8:
Enjoy your DIY balance board or indo board
Tips for Building Balance Boards
Find workarounds if you lack tools or supplies
Remember that “necessity is the mother of invention.” You can use a screwdriver for screws in holes. Instead of a power drill. Opt for sandpaper instead of an electric sander. Go with rectangular scrap-wood over curvy hardwood.
If you don’t own a jigsaw there are some plan Bs. For example, you could use a detail saw instead. Another alternative is many big-box home improvement stores might even cut out the plywood for you if you need it. This can be a big plus if you don’t own a jigsaw.
Spend some time picking your design
Just like other DIY projects you can pick among different board designs. This includes more than a couple options like fish surfboards and snow-boards. Is there a “best” design? It’s really up to you since it’s about selecting a style you’re comfortable with.
Consider using a template
If you want a more precise shape then this is a better option versus drawing the design by hand. Print it out then apply it to the wood before cutting around it. If you draw the shape by hand then use a ruler for more precise shapes.
Consider a basic tail design
This is why a fish tail shape is among the worst choices. A fancy tail will likely get damaged if it slams on the ground. It’s better to go with basic designs like rectangle, oval, or skateboard-style.
Decorate your board
Is this required? No, but it can put your signature on the deck. Choices include:
- Stain
- Varnish
- Paint
- Griptape or Duct Tape
- Decals
Avoid varnish, topcoats, etc. that won’t cause you to slide off the board.
Make tweaks for advanced riders
Here are some choices. Space out bumpers/stoppers more and even to the edges of the board. You can also make the board more challenging by using PVC pipe with a larger diameter.
Create a template for multiple boards
You can cut out the first board then use it as a template. Trace around both sides of the board. so the cuts are symmetrical. This process will take a little more time but will make the boards more uniform.
FAQs

How do you make a home-made balance board?
You’ll just some basic materials and tools. The most important things include plywood, PVC pipe, and sandpaper. Meanwhile, you should also include tools like jigsaw, power drill, and sander. You can also add wood stain, clear gloss, and paint/decals to improve the surface.
Are balance boards worth it?
They’re more than a fitness craze. Balance boards can provide many benefits for longboards including training and rehab. They can also function as kids toys to train your kiddos to become future surfers. Balance and stability are important skills for longboarders so investing less than $50 on a surfboard
Is it easy to ride a balance board?
While making a deck can be quite easy, you’ll need to spend a good amount of time learning how to maintain balance and stability on the board. However, this is worth the effort due to the benefits you can get related to balance and strength, for example.
How do you make a surfboard balance board?
An indo board requires basic components including the deck, bumpers, and grip tape. If you want a deck that’s more surfer-friendly then pick a curvy shape rather than a rectangular shape. This training tool can help you improve your balance, which is critical for catching waves.
How do you make a balance board for hockey?
These balance boards are similar to those for skateboarding, surfing, and roller skating. The board’s instability requires hockey players to recover balance quickly and effectively. This training is effective since ice skaters are constantly maintaining their balance on their skates.
Conclusion
A balance board is an effective longboard training tool to improve your balance, stability, and strength. Should you consider a diy balance board? This is one option and is quite easy by collecting all the right tools and supplies, and doing some prep work. You can then use the deck for training, rehab, or even as a toy skateboard for kids.

hey lisa hayden-matthews, just checked out the article on making a balance board. pretty cool stuff! wondering if there’s a specific type of wood you recommend that’s both sturdy and not too heavy? wanna get it right the first time.
I love the idea of decorating the board as a project with my kids! Any tips on the best paints or stickers that will make the board fun but won’t make it slippery? Safety first!
is it ok to use regular screws i got at home or do i need special ones for the board? don’t wanna mess this up lol
This is exactly what I’ve been looking for! Can’t wait to try making my own balance board this weekend. Does adding a grip tape on top make it better for balance exercises, or is that overkill?
made one of these last year using old skateboard decks. works like a charm if ur looking for a quick fix. but yeah, making one from scratch gives u way more options for customization. cool article
That’s a solid point EZrider. Customization is key for personal style and performance. Props for DIYing.
any tips on where to start for a total newbie? got inspired by you guys!
What a fun project! Thinking this could be a great weekend activity to do with the family. Just hoping I can find all the materials needed locally.
Interesting read on DIY balance boards. Given that there could be significant wear and tear, what are your thoughts on reinforcing the board for extra durability? Any material recommendations?
Loved your article, Lisa! Incorporating a balance board into yoga routines sounds intriguing. Any specific designs you’d think would be more conducive for yoga practices? Excited to make my own!
Saw the part about making tweaks for advanced riders. wondering if adding some kind of led lights or maybe even a way to track your balance score could be a thing? sounds more up my alley than just standing around lol
I found the instructions quite interesting, yet I wonder if this balance board could be used by someone in their sixties without risking injury. Any additional safety recommendations?
Fascinating article! The concept of balance not only pertains to physical steadiness but also resonates deeply with philosophical notions of equilibrium in life. I’m intrigued by the metaphorical implications of building one’s balance board, as it seems to parallel constructing a foundation for personal stability. How do you see the process of making and using a balance board as reflective of achieving balance in other areas of life?
Absolutely adore the idea of making a balance board from scratch! There’s something so rewarding about crafting something with your own hands that you can actually use. Can’t wait to decorate mine. Any suggestions for weather-proofing decorations?
Considering the possibilities for integrating technology with a DIY balance board. Do you think there’s a potential for adding sensors to measure balance efficiency or perhaps an app that guides through exercises specifically designed for balance board usage?
stoked about making a balance board. thinkin it could really help with my surfing during those flat no-wave days. u reckon it’s a good off-season trainer for surfers?
Your article presents an intriguing DIY approach to balance boards, yet seems to overlook the aesthetic aspect of the design process. While function is paramount, the form shouldn’t be neglected. Engaging with the board’s visual appeal could greatly enhance the user’s connection to the object, potentially increasing usage and effectiveness. Have you considered engaging with artists or designers to explore this dimension?
Saw the bit on making a balance board for hockey. Any specific modifications you’d recommend for simulating ice skating movements? Thanks.
Is investing time into making a DIY balance board more beneficial in terms of cost and effectiveness compared to buying one? Looking for the most efficient solution.
Article’s dope, thinking of adding some beast mode to it. Got any suggestions for tweaking the design to increase the difficulty level for someone used to hardcore workouts? Maybe something that challenges balance even more?