
Although I’m no pro, I know what I’m talking about when it comes to skateboarding, and my riding is getting pretty smooth these days since I’ve been trying to do at least an hour of skateboarding after work each day.
I find myself in the situation of being a mentor to all the kids in my road who have been attracted to skateboarding by watching me each day. It wasn’t long before they were all dragging out skateboards they’d been given one christmas or other and asking me how to ollie. As a result, I’ve decided to write a series of articles aimed at absolute beginners.
Even though skateboarding is a very individual sport, or art, if you’re an absolute beginner and you’ve never set foot on a skateboard before then there is probably a certain way you should go about doing things, and that is not to think ollying is what you have to learn first. Instead, over the coming weeks I will be writing a series of ‘lessons’ starting today with the most basic thing you can do – ride your skateboard. If you follow these steps, you should be in pretty good shape.
PART 1

Table of Contents
- 1 1. Forget About Ollying
- 2 2. Set Up Your Skateboard
- 3 Choosing the Right Skateboard for Beginners
- 4 3. Work Out Your Stance
- 5 Safety Gear Importance and Recommendations
- 6 4. Push Off
- 7 Beginner Skateboarding Drills to Improve Balance
- 8 5. Turning
- 9 Common Beginner Mistakes and How to Avoid Them
- 10 6. Stopping
- 11 Tic Tac, Tic Tac
- 12 Nosestalls
- 13 Switching Out Of Fakie
- 14 How to Maintain and Care for Your Skateboard
1. Forget About Ollying
This is probably the biggest mistake the kids in my road make – trying to run before they can walk, so to speak. You’ve got no chance of being able to ollie until you are completely and utterly comfortable with riding around on your skateboard.
2. Set Up Your Skateboard
Get your skateboard sorted out. If you don’t know what the different bits of your skateboard are called then start here and read from there.
As a beginner, the chances are that the one you’ve got is pretty slow, with Abec ‘A’ bearings and a thick, heavy deck. Your deck won’t have much concave (meaning it won’t be very curved) but the good news is that this type of board is less likely to slip away from you so in fact is ideal to learn on.
I would not recommend buying an expensive skateboard at first. Firstly, good skateboards are surprisingly expensive, and if you end up not wanting to skateboard buying one is going to be a waste of money. Secondly, they are a lot faster which makes them harder to ride and less forgiving.
One thing you probably need to do is loosen your trucks because new skateboards tend to have them done up very tightly. Although this is very stable, you won’t be able to turn your skateboard at all and if there is a natural lean to the board (as there usually is) you won’t be able to correct this while pushing off, so you’ll end up riding in to a wall or whatever all the time.
To loosen your trucks, simply unscrew your kingpin a few times so that the board is easier to turn. Some kingpins need an alan key and some need a star shaped screwdriver. If you don’t have the tools, any skate shop should be happy to do this for you free of charge.
Choosing the Right Skateboard for Beginners
Picking the right skateboard can make a big difference in how quickly you learn. Look for a deck that isn’t too wide or too narrow; something around 7.5 to 8 inches wide is usually ideal for beginners. It offers a good balance of stability and manoeuvrability.
For wheels, softer ones (with a durometer rating between 78A to 87A) are better for absorbing shocks from rough surfaces and provide a smoother ride. This makes them perfect for those early days when you’re getting comfortable just riding around.
Trucks should be about the same width as your deck and loosened enough to allow easy turning but not so much that they feel unstable. As you gain confidence, you can adjust the flexibility of your trucks to suit your riding style.
3. Work Out Your Stance

Some things you need to work out straight away – whether you are regular or goofy, and whether you are a ‘mongo foot’. Stand on the skateboard in the most comfortable way for you and then imagine pushing off. If you don’t know the definitions, look them up in the tricktionary –
The tricktionary is my extensive guide to skateboarding trick names and terms. Knowing the correct lingo before you start will make it easier in future to understand trick tips, articles and so on.
If you are a mongo foot, now is the time to teach yourself to push properly before it becomes too natural for you. There are actual technical reasons why it’s bad to push mongo footed – it takes longer to setup for tricks, you are less stable when pushing off (because your weight is behind the skateboard) and beside this mongo footed skaters look awkward and unstylish on their boards.
Safety Gear Importance and Recommendations
When you’re starting out, wearing safety gear is non-negotiable. Protect your head with a well-fitted helmet, which can be a lifesaver in case you take an unexpected tumble. Opt for helmets specifically designed for skateboarding as they offer the best impact protection.
Knee and elbow pads are also important, as they cushion your falls and protect your joints. Look for pads that are comfortable and provide a snug fit. Wrist guards can prevent nasty injuries when you instinctively use your hands to break a fall.
Invest in a good set of protective gear from brands like Triple 8 or Pro-Tec, which are trusted for their quality and durability. This might seem like an extra step, but confidence comes when you know you’re protected.
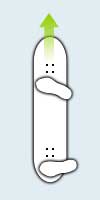
4. Push Off
Start pushing off up a shallow hill or on a level surface. I have noticed that the beginners have a couple of common problems. Firstly, the skateboard tends to get away from them as they are pushing, because they tend to push from a position where their feet are level with each other or even with the pushing foot behind the front foot.
Instead, you should imagine that pushing off is like walking – your pushing foot must step in front of the foot on the skateboard and then push back, just like taking normal steps. Your front foot should be just behind the front bolts.

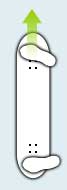
Pushing Off
Secondly, the action of pushing off should be a smooth, powerful movement, not a short, stuttering one. Most of the beginners tend to take about ten small pushes before getting on the skateboard, when a couple of long, smooth pushes will gain the same speed. Most skateboards also have a lean to them which makes them turn one way or the other. While you are pushing off try to use your foot on the skateboard to lean the board one way or the other so it doesn’t turn.
Getting on requires you to twist your foot that’s on the board around to face sideways instead of forwards and step backwards onto the back fishtail. Make sure you step on firmly and confidently and don’t mess about as this is when you are most vulnerable to falling off.
Your feet should be behind the bolts in both cases, so if you don’t get into this position straight away, try to quickly shuffle into the correct position. Many beginners step their back foot either in front or on top of the bolts, and if you do this you must step back onto the fishtail quickly otherwise the skateboard is difficult to control
.
A Stable Riding Stance
For the first few times just ride out the skateboard until it stops, but soon you should get used to pushing more before you run out of speed. Again, this needs to be done confidently, as if you hang about there is every chance the skateboard will slip out from you as you are only riding on one foot.
Beginner Skateboarding Drills to Improve Balance
Improving your balance is key to becoming proficient at skateboarding. Consider practicing on a balance board to enhance your core strength and stability, which directly translates to better control on your skateboard.
You can also try simple drills on the grass or carpet, where your skateboard won’t roll away. Practice standing on one leg, shifting your weight from side to side, and jumping up and down softly to get used to how your body moves with the board.
Incorporate strength exercises like squats and lunges into your routine, which can help develop leg muscles and improve your overall balance. These drills not only make you more confident but also prepare you for more complex tricks as you advance.
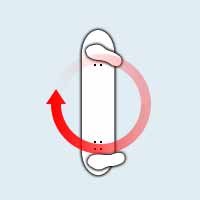
5. Turning
When you’ve got some decent pace just practice gently leaning the skateboard to turn left and right. You don’t need to physically lean your body, but just put more of your weight into your heels or toes.
After a while try lifting the front wheels briefly as you lean to get a sharper turn. Do this by applying a bit more weight to the back tail until the front wheels are off the ground, then aim the nose a bit more towards whichever direction you are facing and put the front wheels back down again. Do this repeatedly while you turn to turn in as tight a circle as possible.
Common Beginner Mistakes and How to Avoid Them
One common mistake many beginners make is standing too stiffly on the board. Skateboarding is all about being fluid and relaxed. Bend your knees slightly and keep your body loose to help absorb the shocks of the ride and maintain control.
New skaters often place their feet too close together or stand flat-footed, which compromises balance. Make sure your feet are shoulder-width apart, and remember to use the balls of your feet to feel the board’s movements.
Another trap is trying to learn everything too quickly, especially complex tricks. Focus on mastering the basics first, like turning smoothly and stopping safely, before progressing to advanced manoeuvres.
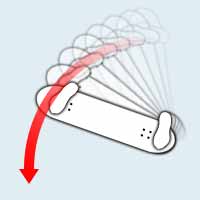
6. Stopping
There are quite a few ways to stop on a skateboard, but most of them are quite advanced – things like powerslides and ‘boneless’ stops will be covered later.
The obvious way for a beginner is what’s known as a tailstop. This is where you grind the tail of the skateboard into the ground, letting the friction slow you down. It works pretty well, although it’s not very efficient if you’re going really fast. You will also wear away the tail of your skateboard – personally I don’t mind this, but you might, depending on how precious you are about the board.
Put it this way – it will take a hell of a lot of tailstops to wear the board down entirely, by which point you almost certainly will want a different one anyway.
Another technique is to do a sort of ‘reverse push’ – where you use your pushing foot to slow yourself down gradually by taking small steps onto the ground that push against the direction of travel. Although again this isn’t that great when you’re going really fast. In those situations you should probably just jump off and worry about what happens to the skateboard later!
Turning also slows you down.

My advice is to use tailstops. Even though it wears your board out, it is a useful ‘trick’ to learn because it’s a start towards practicing your balance. When you first do one, you’re going to need the confidence to stomp the back down quite firmly and then ride out the tailstop at an unfamiliar angle (with the nose in the air) until you come to a halt. While you are doing this, try turning at the same time as well. All these little things will add up and be very useful later on.
Part 1 of this series above is proving to be a bit of a hit so I thought I better get my ass in gear and write some more tips on how to learn skateboarding as a beginner.
When you first start out, everything can be a bit bewildering, especially with the amount of bad advice there is out there on the ‘net (here’s an example of a bad trick tip). People tend to forget what it’s like as a beginner who doesn’t really know anything at all, and as a result you get some rather flippant remarks from more experienced skaters.
Last time I discussed how you shouldn’t try and ollie straight away, but instead should just focus on being able to ride your board properly. When you’re comfortable on it and you can start and stop with ease and shuffle your feet around while moving to get into a better riding position, I think you’re good to move on a bit.
Tic Tac, Tic Tac
Tic tacking is a really important skill to learn. When you are rolling it’s the best way to keep up your speed and in many cases where you don’t have time to move round and push some more it’s the only way to speed up. Also, one of the best things about tic tacking is that it will really increase your balance and comfort on a skateboard a lot.
So the basic gist of the tic tac is moving the nose of the skateboard from left to right and ‘carving’ it against the ground in order to speed up. Don’t ask me to explain the physics in detail, because I don’t know exactly how it speeds you up, but it’s essentially to do with the shifting momentum you generate by putting your weight behind your hips and ‘pushing’ the skateboard forwards
by way of it’s friction with the ground.
Got that? No, didn’t think so. Okay, imagine in your mind the way you speed up on rollerskates or iceskates. You don’t just push your feet forwards, you push them out to the side and forwards. It’s the sideways push that gives you the friction with the ground to speed up, and tic tacking is the same. At the same time, you have to change where you are leaning in order to get your weight centred in the right place.

1. Start in a nice stable stance, either rolling slowly or stationary. I’ve colour coded this for ease of understanding…
- The green arrows represent movement of the nose while it is in the air.
- The red arrows represent the force applied to the skateboard while the front wheels are on the ground.
- The blue shading represents the riders weight distribution – the darker the blue the more weight is applied to that side of the feet.
So, as there is no shading in step 1 of this diagram, the riders weight is distributed evenly.
2. By applying a little weight to the tail the nose is lifted off the ground and pointed to the left a little. As this happens the rider is beginning to lean to the right, shifting weight on to the heels, especially on the front foot.
3. As the front wheels touch down most of the riders weight is on the heels, so the skateboard already wants to turn back to the right again. The rider ‘carves’ the board forwards by pushing against this, with most of the force coming from the front heel where all the weight and therefore power is.
4. The skateboard will push forwards and begin to straighten up again. As it does so, the nose is lifted again and swung around to the right. The riders weight is shifted back towards the left.
5. As the wheels touch down again, most of the weight is on ball of the the riders feet, which is where the push comes from to get the board to carve forwards and back left again. From there, you repeat the motions, swinging left to right and gaining more
and more speed. The key is to get a good rhythm going – if you follow these basics I reckon you’ll pick it up in no time.
Nosestalls
The reason I teach beginners to nosestall is mainly because this simple little trick really helped me to learn how to ollie when I was first learning. Also, it’s going to test your balance and ability to quickly reshuffle your feet whilst moving, and it’s a great way to get into fakie so that you can get a feel for rolling backwards and practice switching.
A nosestall is where you roll up to a lip or ledge of some description and put the nose of the skateboard over it then stall (stop dead) with your weight on the nose and the tail in the air. A kerb is the ideal place to start – it should be just high enough that you have to lift the nose of the skateboard up a bit to get on it
Push (or tic tac!) yourself directly towards the kerb at a moderate speed. Before you reach the kerb, you need to shuffle your front foot up on to the nose of the skateboard so you’ve got one foot on each kicktail, like so…
Just like you did when tic tacking, apply a little weight to your back foot in order to lift the nose just before you hit the kerb. Almost immediately you then have to shift your weight on to the nose so that it stalls on the kerb and the tail hangs in the air. This makes the whole trick a quick see-saw movement.
How much weight you have to shift forwards is entirely dependent on how fast you are riding – if you’re going quite fast, then your weight is going to be thrown forwards anyway due to the sudden stop as the front wheels hit the kerb. In this case, try and moderate your balance so you end up neatly stalled.
If it’s a nice wide kerb you have all the time in the world to collect yourself before dropping back onto the road. You do this simply by shifting your weight back again. The board will just slide off the kerb and start rolling, and you will be in fakie. The more aggressively you shift your weight back, the smoother the drop off the kerb will be.
Switching Out Of Fakie
Being able to switch out of fakie back into your natural stance is a crucial ability to master. Many of the tricks you learn will land you in fakie – coming out of a nosestall is just the beginning. I remember well that switching is quite daunting. At this stage it’s the biggest test of balance to face and you will fall over at some point!
The key to switching, and in fact to rotating in general, is firstly to ‘wind up’ in the opposite direction to the way you want to turn, and secondly to lead the turn with the shoulders. You want to turn ‘backside’ or ‘b/s’ as it’s commonly abbreviated to. This means that during the rotation your heels will be pointing away from the direction of the turn. Therefore you must wind the top half of your body ‘frontside’ or ‘f/s’ before starting, like this:
Remember, this is drawn for a goofy footed skater (someone who rides naturally with their right foot forwards). If you are a regular footed skater, frontside will be the other way around. You don’t have to wind very far, just enough so that you can swing some momentum into the switch.
As I said, your shoulders should lead the turn, which means they are the first part to rotate. In essence, you are simply unwinding your body from its wound up position. As you do this, again apply a little weight to the tail so the nose lifts off the ground. Your hips will naturally follow the shoulders, and then so will your feet, taking the skateboard with them.
It may take a while to rotate a full 180° but there is no substitute for practice in this case. Try to keep your body weight centred above the skateboard. If too much of your weight hangs over the back wheels (where you are pivoting
from) then the skateboard could easily shoot out from under you. As you come towards the 180° mark, remember to ease the front wheels down so they touch down solidly.
How to Maintain and Care for Your Skateboard
Keeping your skateboard in good shape not only improves performance but ensures safety. Regularly check your bearings and wheels for signs of wear. If the wheels are too worn down or develop flat spots, they can affect your ride quality. Clean the bearings periodically and apply a lubricant to ensure they spin freely.
Inspect the deck for cracks or chips, particularly along the edges, which could weaken it. Make sure the grip tape on top remains in good condition for keeping your feet securely positioned on the board.
Remember to tighten or loosen the trucks as needed. This small adjustment can change how your board handles turns and provides a better ride experience. With consistent care, your skateboard will last longer and perform better on the streets.
