So you want to make your own lacrosse stick? While it’s definitely possible – it’s going to take some woodworking skills in order to create a lacrosse stick that you can actually use for the game.
Note that we said “woodworking” because a DIY lacrosse stick is often made of wood. Now, the sticks used by professional players are made of metal and it’s possible to make your own using this material. Again, it takes some skill on your part as well as practice.
Table of Contents
Parts of a Lacrosse Stick

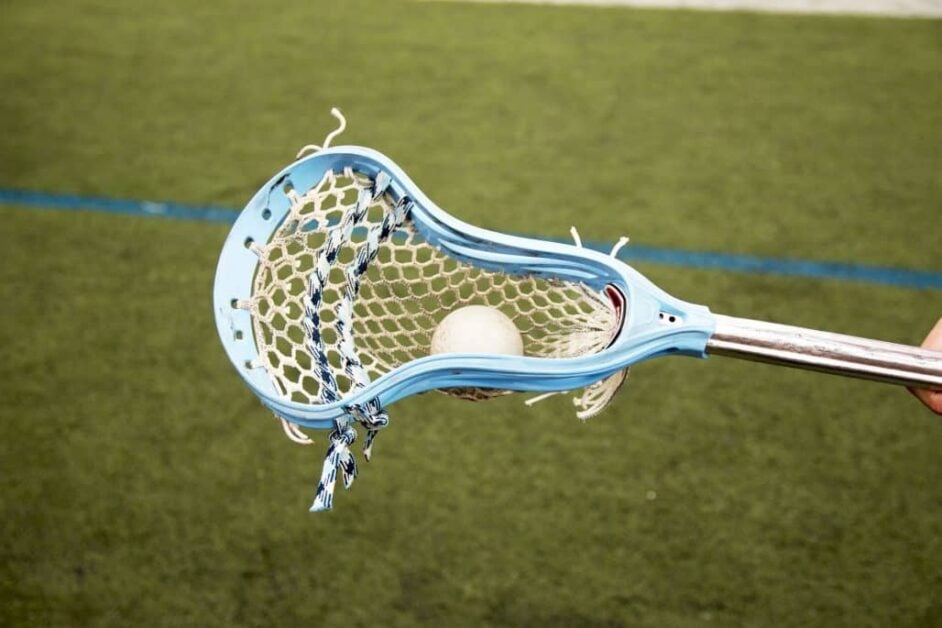
What exactly do we mean when we say “lacrosse stick”? Are we only talking about the stick itself or does that include the net end of the equipment? If you’re a lacrosse player, you’d understand that the word “stick” refers to the totality of the equipment. Hence, the handle as well as the net form part of the stick.
So how many parts does a lacrosse stick have? There are three – the shaft, the pocket, and the shooting strings. The shaft is the long portion of the stick or the handle. The pocket is the narrow opening at the end of the stick where the ball is held when there is no intention of shooting it yet.
The shooting strings, obviously, are how the lacrosse ball is launched from the stick into whatever target the player might have. Another term that is often used is the “head” which refers to the widest part of the stick where the netting is located.
Since there are there different components to a lacrosse stick, you also have to make each one if you want to create a completely homemade lacrosse stick. Of course, it’s possible to just make one part – such as the shaft – and buy pocket and shooting strings premade. That decision depends on you, however, and in this article, we’ll try to teach you how to DIY the shaft part of the lacrosse stick.
The Lacrosse Stick Build

Even before we proceed with making a lacrosse stick, it’s important to first discuss how all these parts come together. If you have a lacrosse stick right now, you might want to grab it for reference. Do you have it? Great! If not, you can easily find an image of one. Note that the stick is often octagon-shaped for a better grip instead of being circular.
Now, the shaft is the handle of the stick. The end should have a rubber cover to keep the edge safe in case of unintended hitting among players. This part is called the “butt end” among players.
The “head” of the stick is where you can find the pocket and the shooting strings. It starts off narrow and then curves wide – like the paddle of a boat but with much curvier edges. The head is typically screwed onto the stick to make sure it doesn’t fall off in the middle of the game.
DIY Lacrosse Shaft

The shaft is often made from light and durable metals like titanium, aluminum, and scandium. If metal is used, the center of the shaft is usually hollow but with wood, this can be tough to accomplish. Length is governed by regulation standards which actually vary depending on the player’s position in the game.
Step 1: Setting the Standard
So if you’re an offensive player, your stick should be 40 to 42 inches long. If you’re a defense player, it should be 52 to 72 inches long. Note that defensemen may have longer sticks as this gives them the chance to better execute defensive plays while in the field.
For goalies, the standard is anywhere from 40 to 72 inches – giving them the widest possible range of choice. As for the circumference of the stick – it should be no more than 3.5 inches – even with tape added onto the surface of the shaft for a better grip. Now, if you’re going to create a lacrosse stick – these are the standards you have to keep in mind.
Step 2: Find your Wood
There are 5 different types of wood that are often suggested for lacrosse sticks. Of course, your option really depends on what characteristic you want from the wood. For example – do you want it strong or do you prefer it pliant? Hickory is a hard wood that’s a common choice for DIY stick makers. There’s also white oak, red oak, ash, and rip wood solid ash wood.
Step 3: Cut it to Size
This is where the danger comes in as you want to cut wood in a precise size and shape for lacrosse. To do this, you’ll need to use a cutsaw or some other tool that will offer you the same perfect cut. Take note of the circumference and length needed for your shaft.
Ideally, you should have a premade head for fitting and measuring purposes. Remember – the standard given a few paragraphs above is a measurement that already includes the head. Hence, make sure to also measure the head and then make the necessary adjustments.
Don’t forget that the head has a little slot at the end where the shaft is supposed to go. This would be buried so you’ll have to subtract that particular length from the overall computation to get the perfect size that you want.
Use the connecting portion of the head to properly judge the thickness of the shaft. If you bought a standard head, then the shaft itself should fall within regulation standards.
Now, there’s no need to cut the shaft into a perfect octagon shape – mainly because this will require precise cuts on the side. If you’re used to a cutsaw, this should not be a problem. If you’re new to the tool however, you might want to skip this part and simply settle for a good hold on the stick.
Step 4: Sand it Down
Wood has numerous splinters if not sanded down so make sure you refine the surface until there’s nothing sticking out of the material. This is the part that takes a lot of time, especially if you’re using different grits of sandpaper to create a fine and smooth surface.
Once you’re happy with the exterior, you can now apply a stain on the wood to create that beautiful finish. If you have a pre-made head, just attach the head to the shaft and secure it with screws.
Step 5: Fit the Head and Practice Play
Once you’re happy with the shaft, attach the premade head and try going through your training with this new equipment. Have a feel for the item and make necessary adjustments to help you play better. Remember not to go beyond the standards set by the rules.
The Lacrosse Head

Now, the lacrosse head requires more skill to make. You’ll find that it would be easier to buy one rather than make it yourself. Would making one be cheaper though? Not necessarily. If you have PVC pipes and a heat gun in your home – and you know how to use them, then you’ll find that making your own would be cheaper in the long run.
When making the head, what you need is a reference to help you properly copy the mold, angles, and curves of the design. The PVC pipe is cut down the center to open it up.
Heat is then applied to make the pipe more pliable and for the molding process to begin. As with the shaft, the head is regulated by the NCAA. For men, the head must be 6 to 10 inches wide at its widest point. Goalies however are allowed to have larger heads of 10 to 12 inches at its widest point.
Lacrosse Stitching
Once you have a workable lacrosse head, the next step is to stitch it according to your personal preferences. This is actually something that you have to learn as a lacrosse player. Even some of the best professional players today stitch their own nets just to make sure that they got the perfect whip for their game.
Why do they do this? Well, the stitching of a net is a deeply personal preference. There are so many factors that go into the stitching process starting with the material you’ll be using, the size of the weaves, and the depth of the mesh.
Now, there’s no “standard” way of stitching the string. The fact is that there are several patterns today and in order to create your mesh, you’d want to choose a pattern and follow it through.
Some of the most popular strings include the 9 Diamond Top String which provides for a medium pocket. There’s also the deeper 9 Diamond Hidden Top String. What you have to remember with strings is that there’s still a standard there. For the top string, the length must be around 22 to 24 inches. The sidewall is also 22 to 24 inches while the bottom string should be 6 to 8 inches.
Final Word
To wrap it up – making your own lacrosse stick takes work, time, dedication, and skill with woodworking. It may look simple if you watch a video of it being made but in practice, the whole process can be quite frustrating.
